
AquaCare High Pressure 8-mode Handheld Shower...
$29.94
ELYKEN Pool Towel Rack Outdoor, 59" Outdoor T...
$59.99
Arofa Handheld Toilet Bidet Sprayer for Toile...
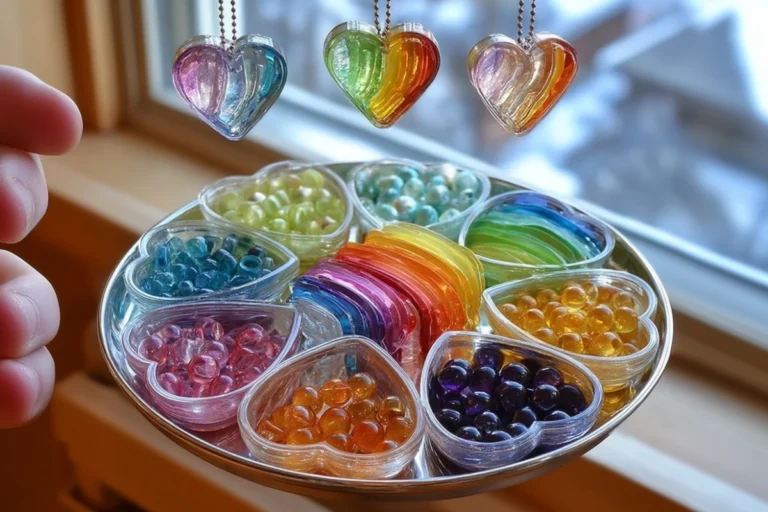
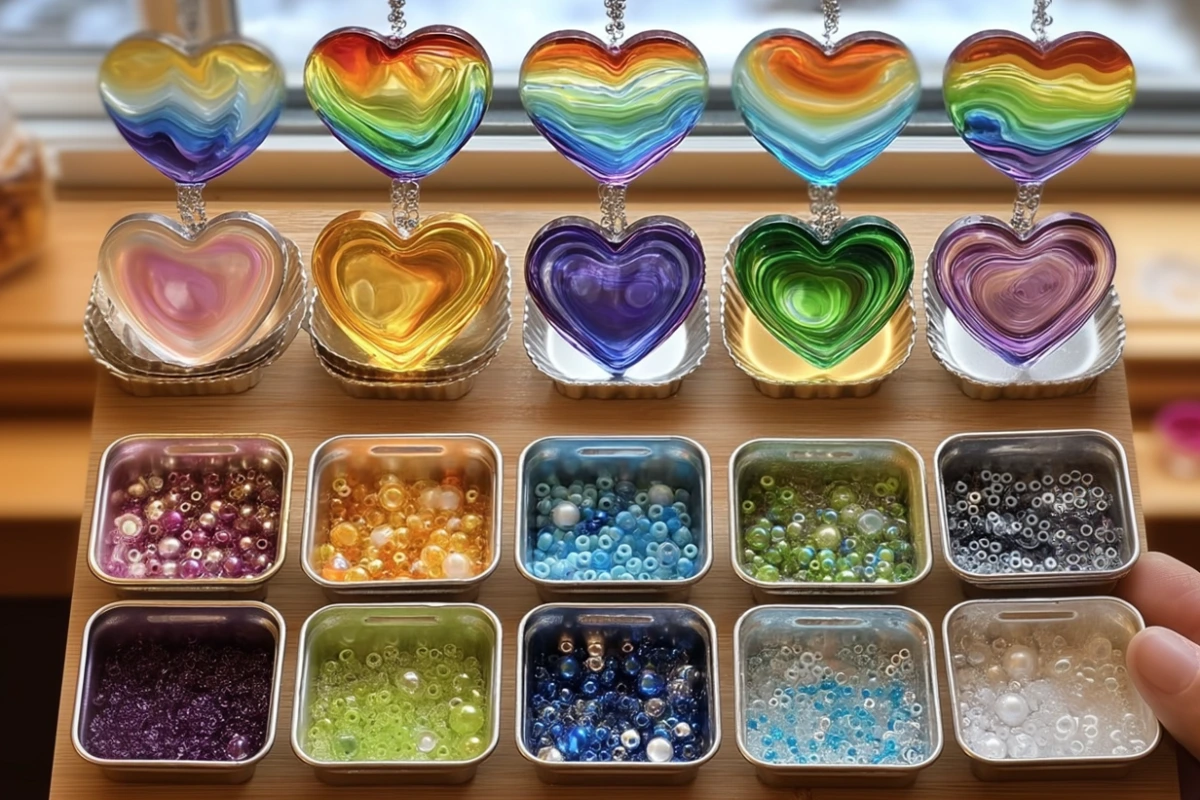
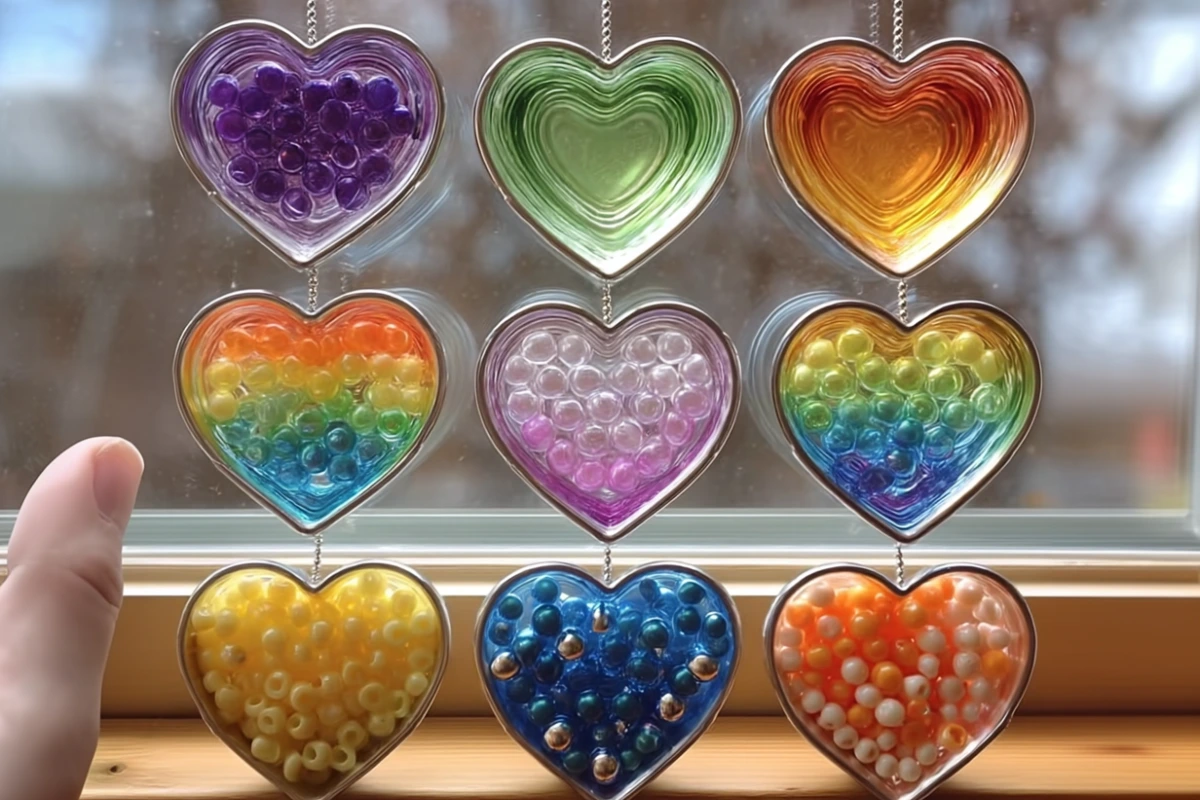
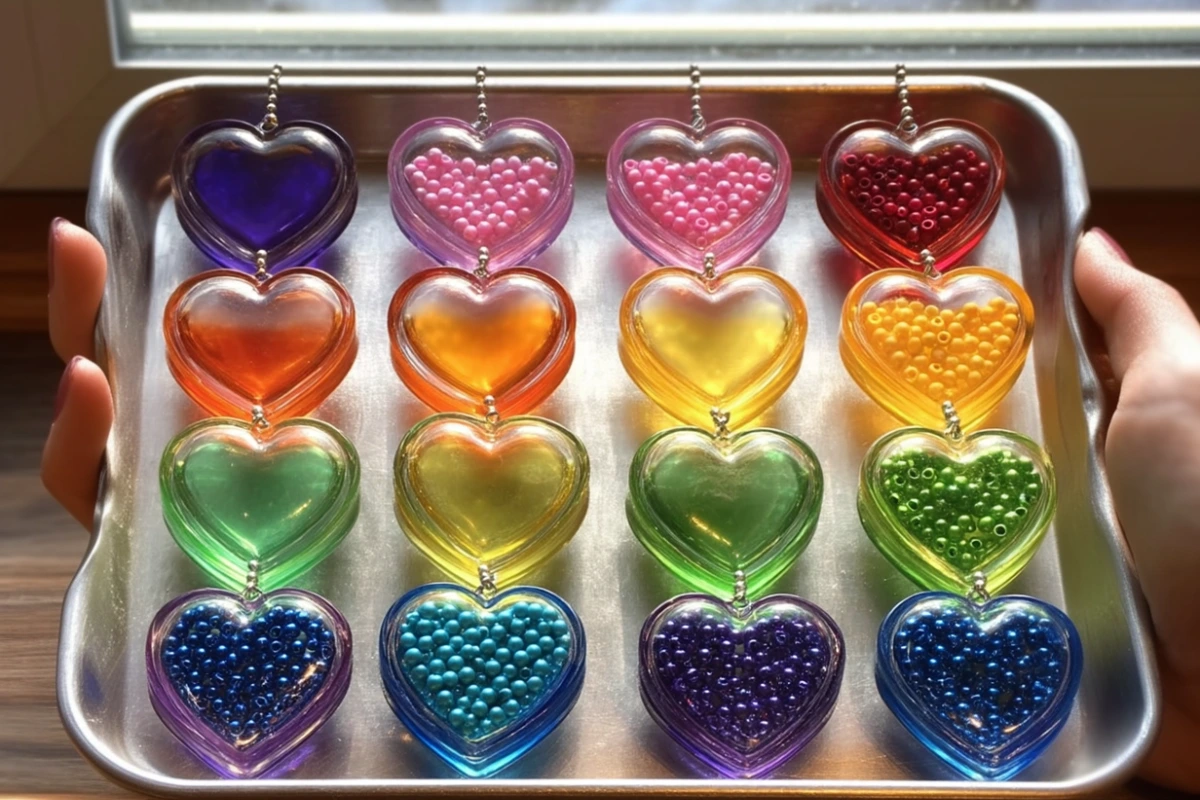
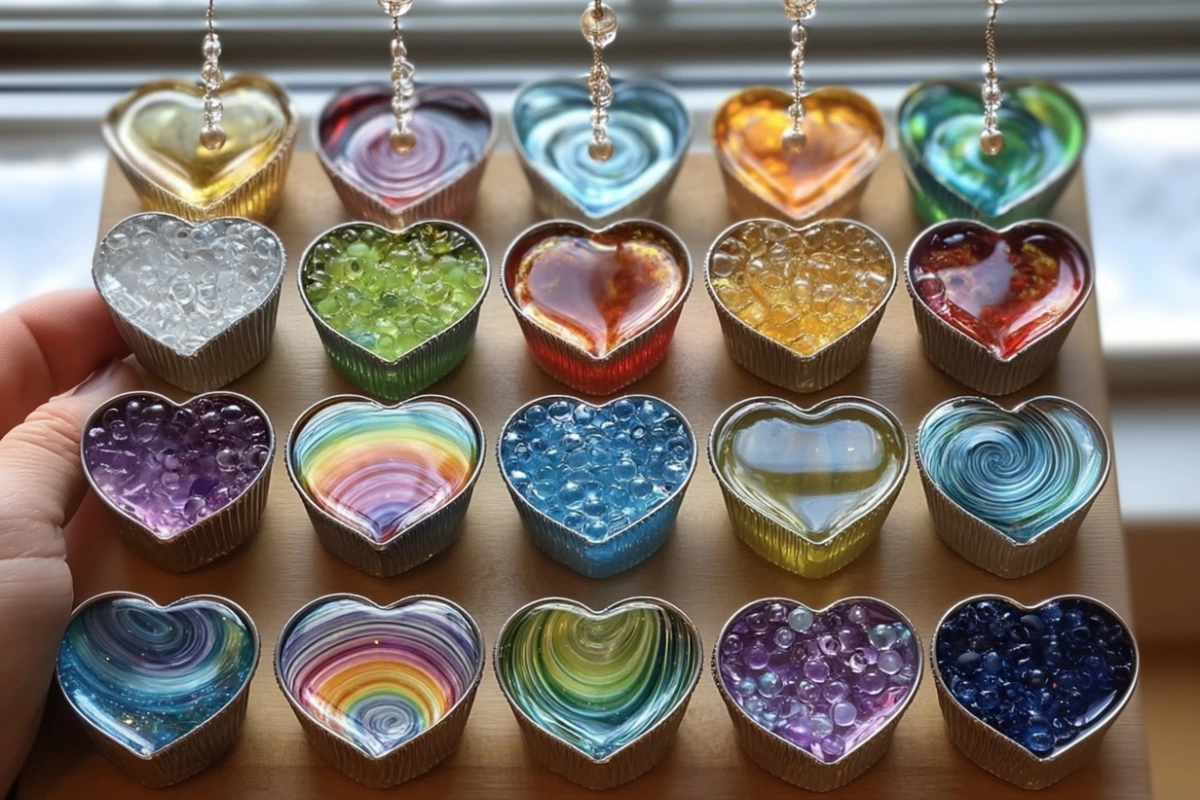
40% OffEver stared at a window and thought, “This spot could use some sparkle”? Melted bead suncatchers are an easy and colorful way to bring personality and a pop of color into any space. This fun DIY craft is perfect for families, teachers, or anyone looking for a creative afternoon project. Whether you’re making them for summer parties, gifts, or just because—this project is a guaranteed hit!
Materials You’ll Need

Kitchen Sink Drain Strainer Sink Stainless St...
$6.99
Brawny Tear-A-Square Paper Towels, 6 Double R...
$13.68 ($2.28 / 100 Sheets)
Amazon Basics 2-Ply Flex-Sheets Paper Towels,...
$22.86 ($1.27 / 100 Sheets)The Essentials
To get started, here’s what you’ll need:
-
Translucent plastic pony beads (variety of colors)
-
Metal baking molds, muffin tins, or cookie cutters
-
Aluminum foil or a metal baking sheet
-
Drill or small nail (for making a hole)
-
Fishing line, string, or ribbon (for hanging)
-
Oven (a conventional one works best)
Optional Add-ons
-
Oven thermometer (for accurate temp)
-
Gloves for handling hot items
-
Tweezers (for placing beads precisely)
Safety First

Starbucks K-Cup Coffee Pods, Toasted Coconut ...
$15.66 ($0.71 / Count)AquaCare High Pressure 8-mode Handheld Shower...
$29.94
Simply Gourmet Measuring Cups and Spoons Set ...
$36.99Why Ventilation is Crucial
Melted plastic may release fumes, so make sure to ventilate your workspace. Open windows, switch on ceiling fans, and if you have one, use a kitchen exhaust fan to keep the air clean.
Tools for Safe Crafting
-
Oven mitts or heat-resistant gloves
-
Metal baking sheets to prevent warping
-
Always supervise children—this project uses heat!
Step-by-Step Instructions
Step 1 – Preheat the Oven
Preheat your oven to 400°F (204°C). Let it come to full temperature before baking your bead designs. This ensures even melting and prevents undercooked suncatchers.
Step 2 – Prep Your Mold
If you’re using cookie cutters or muffin tins, line a baking sheet with foil. Place your molds on the sheet to avoid any spillage or sticking. This also makes clean-up a breeze!
Step 3 – Arrange the Beads
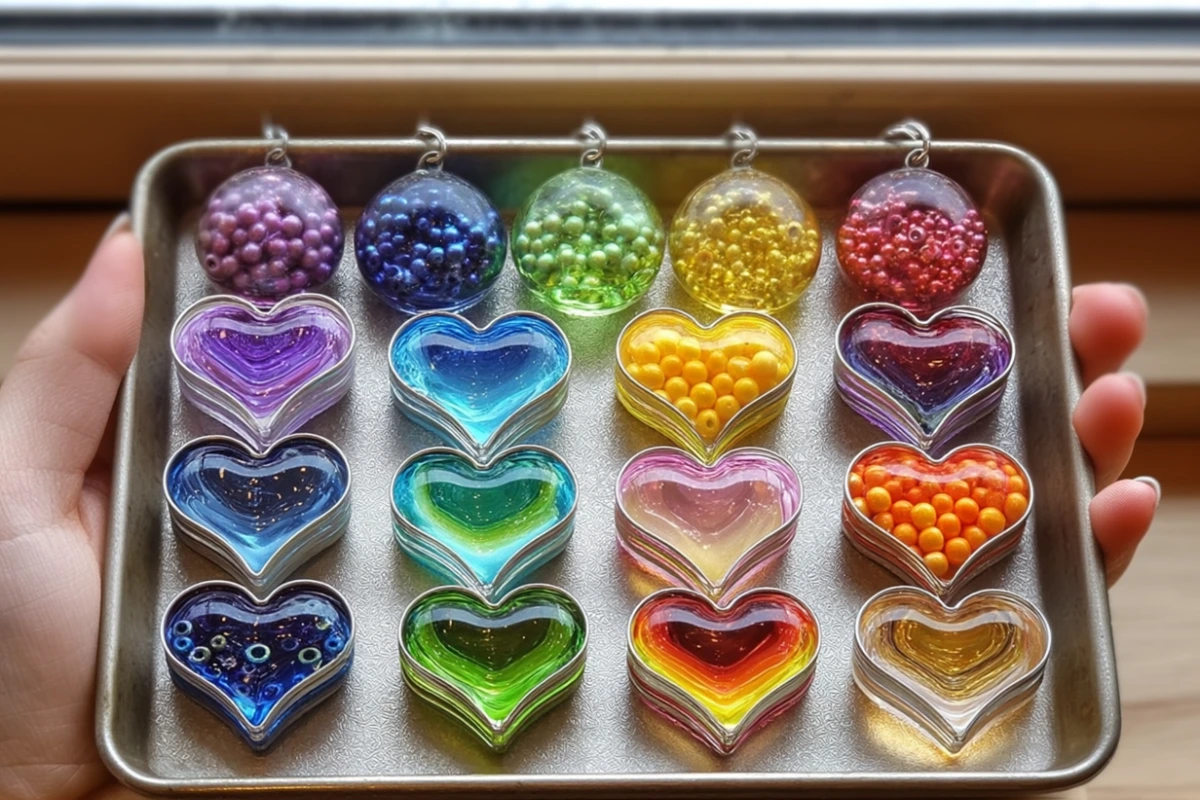
Get creative here! Fill the base of your mold with pony beads in any pattern you like—rainbows, spirals, or abstract swirls. Make sure the beads are touching and spread evenly across the base. This ensures a smooth melt and reduces holes.
Step 4 – Bake to Melt
Place your tray in the oven. Bake for 20–25 minutes, or until the beads are fully melted and fused together. You’ll know it’s ready when the beads have a glassy, liquid appearance and no longer hold their shape.
Step 5 – Let it Cool
Take the tray out (use oven mitts!) and allow the suncatchers to cool completely—this takes about 30 to 60 minutes. Don’t rush this part! Once hardened, pop them out of the molds.
Step 6 – Add a Hanging Hole
Use a drill or gently hammer a nail through the top edge to make a small hole. This is where your fishing line or ribbon will go.
Step 7 – Hang and Enjoy
Thread the line or ribbon through the hole, tie it securely, and hang your beautiful suncatcher in a sunny window. Watch the colors dance!
Tips for Best Results

Redsack Rechargeable Water Dispenser Pump for...
14% Off
Caring Nitrile Exam Gloves, Blue, Powder-Free...
15% Off
PH PERKHOMY Pink Butcher Paper Roll 18" x 240...
$14.99 ($0.05 / Sq Ft)Design Ideas
-
Try alternating colors for a mosaic effect.
-
Use heart-shaped molds for Valentine’s Day.
-
Spell out initials or shapes for a personalized touch.
Using Cookie Cutters vs Muffin Tins
-
Cookie Cutters: Great for fun shapes but must be used on a foil-lined tray.
-
Muffin Tins: Best for round suncatchers, super easy for kids.
How to Get a Smooth Finish
Avoid overloading beads. A single even layer melts best. Also, let the piece cool naturally to avoid warping.
Creative Variations
Amazon Brand - Presto! Flex-a-Size Paper Towe...
$28.40 ($1.50 / 100 Sheets)
RWSEFK 20 Sets, snack containers,reusable sna...
$9.68 ($2.15 / Fl Oz)
Drinking Glasses with Bamboo Lids and Glass S...
19% OffThemed Suncatchers for Holidays
-
Red, white & blue for Independence Day
-
Orange and black for Halloween
-
Pastels for Easter
Layered and Swirled Effects
Stack layers of beads in two different shades for a swirling effect when melted. Use a toothpick to gently swirl the beads before baking.
Glow-in-the-Dark Beads
For a magical nighttime glow, include glow-in-the-dark pony beads. These are especially fun for kids’ bedrooms or night gardens.
Frequently Asked Questions About Melted Beads
Medline Shower Chair for Inside Shower, Heavy...
17% Off
Upgraded 3in1 Kitchen Sink Drain Strainer & S...
11% Off
16inch 2 Pack Grab Bars for Bathtubs and Show...
$26.50-
Can I use regular plastic beads?
Nope—only translucent pony beads work well. Others may not melt correctly or release harmful fumes. -
Will the melted plastic stick to my pan?
If unlined, yes. Always use foil or dedicated baking molds. -
Is it safe to do this with kids?
Yes, but always supervise when the oven is involved. Let them do the bead arranging—it’s the fun part! -
Can I use silicone molds?
It’s better to use metal molds. Silicone can warp and might not release the suncatcher as easily. -
How do I clean up after?
Let molds cool completely, then wash with warm, soapy water. Leftover plastic usually pops right out!
Conclusion

zaa Bathtub Drain Hair Catcher, Premium Silic...
29% OffAmazon Basics 2-Ply Flex-Sheets Paper Towels,...
$22.86 ($1.27 / 100 Sheets)
Brita UltraMax Large Water Dispenser With Sta...
1% OffMelted bead suncatchers are a vibrant and joyful craft that turns a simple handful of beads into something truly magical. Whether you’re crafting with kids on a rainy afternoon or creating whimsical window décor for your home, this DIY project is equal parts simple and stunning. So, gather your beads, preheat the oven, and let the sun shine through your colorful creations!
FAQs
Q1: Can I use two layers of beads for a thicker suncatcher?
A1: Yes, but be cautious—it takes longer to melt and cool, and may not be as light-catching.
Q2: What should I do if the beads give off a strong smell?
A2: Turn off the oven, ventilate immediately, and consider using a lower temperature next time. Always ensure good airflow.
Q3: Can I mix opaque beads with translucent ones?
A3: You can, but it will reduce the light-filtering effect. Stick to translucent for true “suncatcher” magic.
Q4: How do I store finished suncatchers?
A4: Keep them flat in a cool, dry place. Avoid stacking to prevent scratches.
Q5: Can I make keychains instead of suncatchers?
A5: Absolutely! Just drill a smaller hole and use a metal keyring instead of ribbon or string.

Amazon Brand - Presto! Flex-a-Size Paper Towe...
$28.40 ($1.50 / 100 Sheets)
Portable Bidet - 250ml Tank Peri Bottle for W...
$39.99
Melted Bead Suncatchers
- Total Time: 1 hour (includes cooling)
- Yield: Varies by mold size (approx. 4–6 suncatchers)
Description
Create vibrant melted bead suncatchers using pony beads and simple supplies — perfect for summer fun, home décor, or kids’ crafts!
Ingredients
1 pack translucent plastic pony beads (variety of colors)
1 metal muffin tin or baking mold
1 sheet of aluminum foil or a metal baking sheet
1 piece of fishing line, string, or ribbon (for hanging)
1 drill or nail (for making holes)
Instructions
Preheat oven to 400°F in a well-ventilated area. Line a baking sheet with foil and place molds. Add pony beads in a single, even layer. Bake for 20–25 minutes until fully melted. Cool completely, then drill a hole for hanging. Thread ribbon or line and display in sunlight.
Notes
Ensure proper ventilation while baking due to light fumes. Use metal molds or cookie cutters only. An oven thermometer helps ensure accuracy. Kids should be supervised during all steps involving heat or sharp tools.
- Prep Time: 10 minutes
- Cook Time: 20–25 minutes
- Category: DIY Crafts
- Method: Oven-baked
- Cuisine: Not applicable
Nutrition
- Serving Size: 1 suncatcher
- Calories: N/A
- Sugar: N/A
- Sodium: N/A
- Fat: N/A
- Saturated Fat: N/A
- Unsaturated Fat: N/A
- Trans Fat: N/A
- Carbohydrates: N/A
- Fiber: N/A
- Protein: N/A
- Cholesterol: N/A
Keywords: melted bead suncatchers, DIY sun catchers, pony bead crafts, kids summer project, homemade suncatchers

PUR PLUS Vertical Faucet Mount Water Filtrati...
5% OffAmazon Brand - Presto! Flex-a-Size Paper Towe...
$28.40 ($1.50 / 100 Sheets)