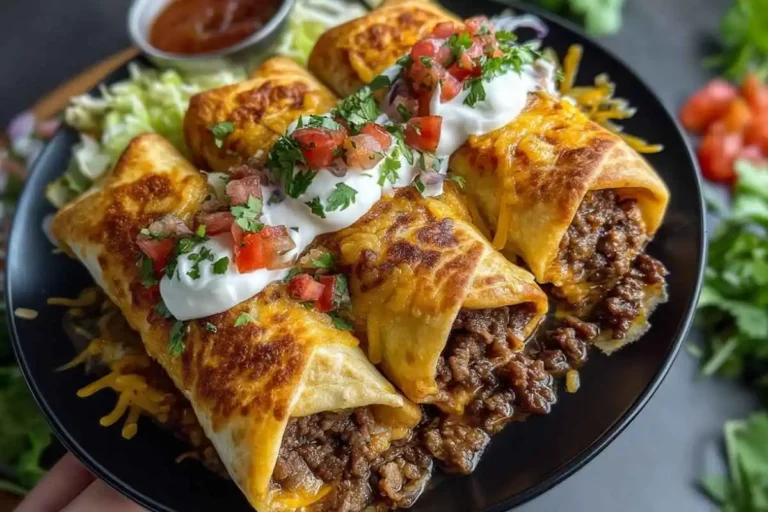
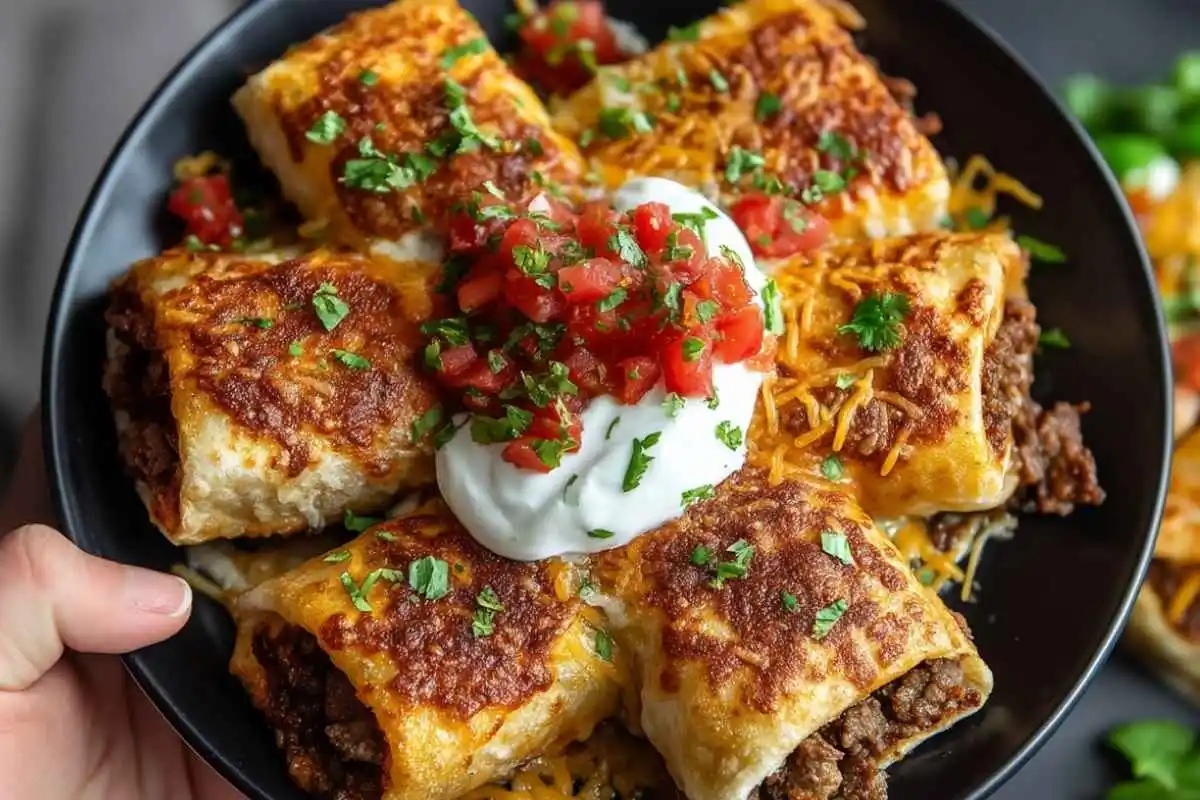
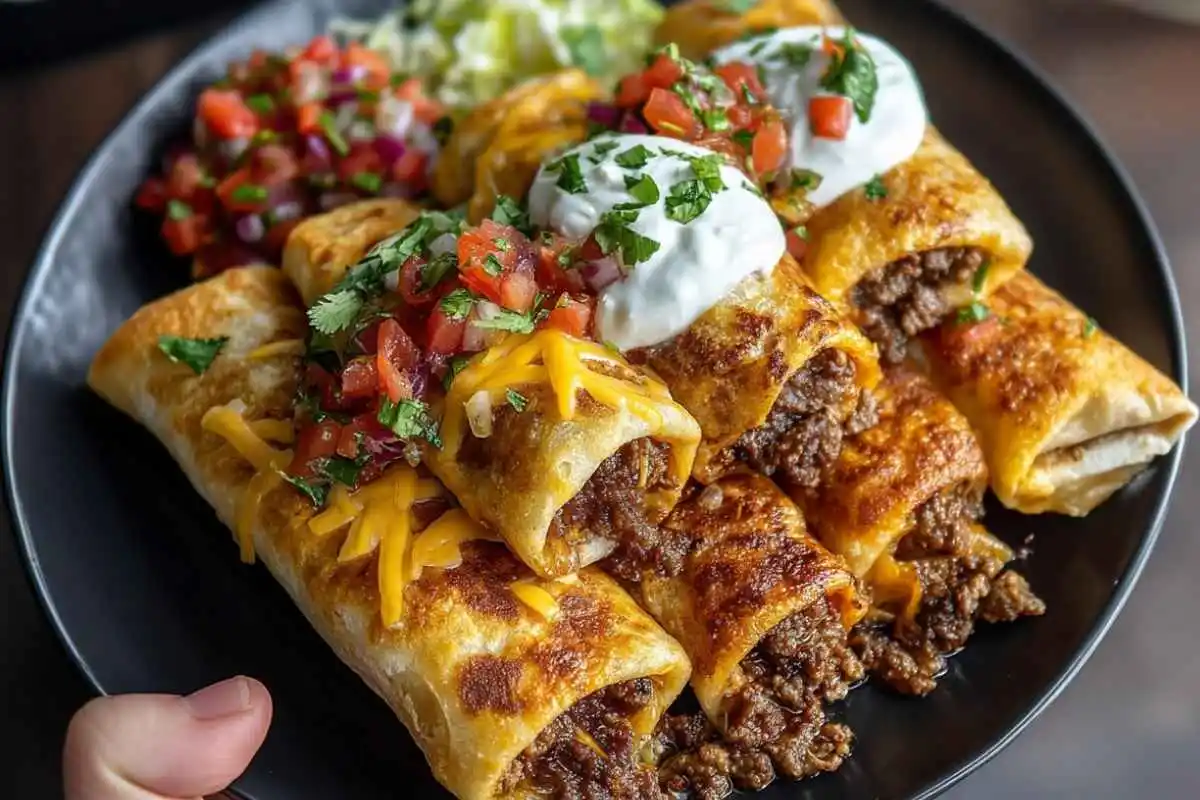
If you love crispy, cheesy Mexican food but want something that’s easy to make at home, look no further than Beef and Cheese Chimichangas. These golden, crunchy parcels are filled with seasoned beef, melted cheese, and wrapped in a warm tortilla that is either fried or baked to crispy perfection.
Want to make the best homemade chimichangas even easier? Grab all the tools and pantry essentials you need right here and get ready to whip up crispy, cheesy perfection anytime!
Equipment (Shop now on Amazon):
-
Large nonstick skillet – perfect for browning beef evenly – Check it out
-
Mixing bowls – for prepping your filling and toppings – Shop here
-
Baking sheet with parchment paper – a must for the baked version – Get it here
-
Deep fryer or heavy-bottomed skillet – for that classic crispy fry – Buy now
-
Tongs – handy for flipping chimichangas safely – Find them here
Ingredients (Quick and easy to stock up):
-
Taco seasoning packets – for effortless flavor – Buy here
-
Flour tortillas – soft and perfect for wrapping – Shop now
-
Cheddar and Monterey Jack cheese – melty, cheesy goodness – Get it here
-
Salsa and sour cream – classic toppings made easy – Grab them here
In this article, you’ll learn how to make beef and cheese chimichangas using simple pantry ingredients, with plenty of expert tips to ensure they come out perfectly every time.
What are Chimichangas?
Chimichangas are essentially deep-fried burritos, originating from the southwestern United States, particularly Arizona. They typically consist of a flour tortilla filled with a savory mixture like seasoned meat, cheese, and beans, then fried until crisp and golden.
They are beloved for their crunchy exterior and warm, melty fillings, making them a standout favorite at many Mexican restaurants. Now, you can easily recreate this restaurant favorite at home.
Ingredients You’ll Need
Gather these simple ingredients before you start:
-
1 lb ground beef
-
1/2 cup onion, finely chopped
-
2 cloves garlic, minced
-
1 packet taco seasoning
-
1/2 cup water
-
1 cup shredded cheddar cheese
-
1 cup shredded Monterey Jack cheese
-
6 large flour tortillas
-
1/4 cup melted butter or vegetable oil (for brushing)
-
Sour cream, salsa, and chopped cilantro for serving
How to Make Beef and Cheese Chimichangas
Follow these step-by-step instructions to make perfect chimichangas at home.
Step 1: Cook the Beef Mixture
-
In a large skillet over medium heat, add the ground beef and cook until browned, breaking it apart with a spoon.
-
Add the finely chopped onion and cook for about 3 minutes, until softened.
-
Stir in the minced garlic and cook for another 30 seconds until fragrant.
-
Sprinkle in the taco seasoning and add 1/2 cup water.
-
Stir well, reduce heat, and simmer for about 5 minutes until the mixture thickens and flavors meld together.
-
Remove from heat and let it cool slightly.
Step 2: Assemble the Chimichangas
-
Warm the flour tortillas slightly in the microwave or a skillet to make them more pliable.
-
Spoon a generous portion of the beef mixture into the center of each tortilla.
-
Sprinkle a combination of shredded cheddar and Monterey Jack cheese over the beef.
-
Fold in the sides and roll up the tortillas tightly to enclose the filling.
Step 3: Bake or Fry the Chimichangas
Baking Method for Healthier Chimichangas
-
Preheat your oven to 400°F (200°C).
-
Place the rolled chimichangas seam-side down on a baking sheet lined with parchment paper.
-
Brush each chimichanga lightly with melted butter or vegetable oil.
-
Bake for 20-25 minutes, flipping halfway through, until golden and crispy.
Frying Method for Traditional Crispy Chimichangas
-
Heat about 1 inch of vegetable oil in a deep skillet over medium-high heat.
-
Once the oil is hot (about 350°F or 175°C), carefully place the chimichangas seam-side down into the oil.
-
Fry for 2-3 minutes per side until golden brown and crispy.
-
Remove and drain on paper towels.
Pro Tips for Perfect Chimichangas
Making chimichangas at home can be incredibly easy with these helpful tips:
How to Keep Chimichangas Crispy
-
Make sure the beef filling isn’t too wet. If needed, let it cook a little longer to evaporate excess moisture.
-
Always place chimichangas seam-side down when baking or frying to keep them sealed.
-
Use a wire rack to cool fried chimichangas instead of paper towels to prevent sogginess.
Choosing the Right Cheese
For the ultimate cheesy experience, use a blend of cheddar for sharpness and Monterey Jack for creamy meltiness.
You can also add a sprinkle of mozzarella if you want a super stretchy cheese pull!
Adjusting Seasonings
-
Add a pinch of crushed red pepper for extra heat.
-
Stir a handful of chopped cilantro into the beef filling for freshness.
-
Swap out taco seasoning for homemade seasoning if you want to control the salt and spice levels.
Serving Suggestions
Beef and Cheese Chimichangas are a complete meal on their own, but you can easily elevate them with some delicious sides and toppings.
Best Side Dishes to Serve
-
Mexican Rice: Flavorful and fluffy, it pairs perfectly.
-
Refried Beans: A creamy side that complements the crunchy chimichangas.
-
Elote (Mexican Street Corn): Sweet, creamy, and tangy grilled corn.
-
Simple Green Salad: A fresh and crisp balance to the richness.
Toppings That Make a Difference
Top your chimichangas with:
-
Sour cream
-
Fresh salsa
-
Chopped cilantro
-
Sliced avocado or guacamole
-
Pickled jalapeños for a spicy kick
Variations You Must Try
Feel free to get creative with your chimichangas! Here are a few delicious variations:
Chicken and Cheese Chimichangas
Swap the ground beef for shredded rotisserie chicken mixed with taco seasoning. It’s a lighter but equally tasty alternative.
Breakfast Chimichangas
Fill tortillas with scrambled eggs, cooked sausage, and cheese for an indulgent breakfast option.
Vegetarian Chimichangas
Use a filling of black beans, corn, sautéed bell peppers, onions, and lots of cheese for a hearty meatless version.
How to Store and Reheat Chimichangas
Storage Tips
-
Allow chimichangas to cool completely before storing.
-
Place them in an airtight container and refrigerate for up to 3 days.
-
For longer storage, wrap each chimichanga tightly in foil and freeze for up to 2 months.
Reheating Instructions
Reheating from the Fridge
-
Preheat your oven or air fryer to 375°F (190°C).
-
Place chimichangas on a baking sheet and heat for 10-12 minutes, flipping once.
Reheating from Frozen
-
No need to thaw! Bake frozen chimichangas at 375°F (190°C) for 25-30 minutes until heated through and crispy.
Why Homemade Chimichangas Are Better Than Takeout
Making chimichangas at home not only saves you money but also lets you control every ingredient for the freshest, tastiest results.
Benefits of Homemade Chimichangas
-
Fresher Ingredients: No preservatives or mystery fillings.
-
Healthier Options: Bake instead of fry and control the fat content.
-
Customization: Tailor fillings to suit your taste preferences or dietary needs.
-
Family Fun: A great recipe to make with kids or friends.
Common Mistakes to Avoid
Stay away from these pitfalls to ensure your chimichangas come out perfect:
Overstuffing the Tortilla
Too much filling makes it difficult to seal and fry properly, leading to leaks and messes.
Not Sealing Properly
Always fold and roll tightly, and place seam-side down to secure the filling inside during cooking.
Frying at Incorrect Temperatures
-
If the oil is too hot, the tortilla will burn before the filling heats through.
-
If the oil is too cool, the chimichangas will absorb too much oil and become greasy.
Aim for an oil temperature of about 350°F (175°C) for the best results.
Nutritional Information (Per Serving)
While it varies based on the size and preparation method, here’s an approximate breakdown:
-
Calories: 450-500
-
Protein: 25g
-
Carbohydrates: 35g
-
Fat: 28g
-
Fiber: 3g
-
Sugar: 2g
Note: Baking your chimichangas will reduce the fat content significantly.
Conclusion
Beef and Cheese Chimichangas are the ultimate comfort food you can easily create in your own kitchen. With crispy, golden tortillas packed with seasoned beef and melted cheese, every bite delivers unbeatable flavor and texture. Whether you bake them for a healthier version or fry them for the ultimate crunch, these chimichangas are sure to become a favorite for family dinners, parties, or casual get-togethers.
Pair them with your favorite toppings and sides for a complete meal that’s guaranteed to impress. Once you try making homemade chimichangas, you might never go back to restaurant versions again!
FAQs About Beef and Cheese Chimichangas
Can I use ground turkey instead of beef?
Absolutely! Ground turkey is a leaner alternative and works beautifully with the same seasonings.
Can I make chimichangas ahead of time?
Yes. Assemble the chimichangas and refrigerate them for up to 24 hours before baking or frying. You can also freeze them for later.
How do I keep baked chimichangas crispy?
Brush them lightly with oil or melted butter and bake at a high temperature (400°F). Flipping halfway through baking also helps achieve even crispness.
What’s the best cheese for chimichangas?
A mix of cheddar and Monterey Jack gives you a perfect balance of sharp flavor and creamy texture, but you can use any cheese you love.
Are chimichangas spicy?
The traditional beef and cheese chimichanga is flavorful but not overly spicy. If you want heat, add jalapeños or extra chili powder to the filling.
Print
Beef and Cheese Chimichangas
- Total Time: 40 minutes
- Yield: 6 chimichangas 1x
Description
Crispy beef and cheese chimichangas loaded with seasoned ground beef, cheddar, Monterey Jack, and wrapped in a golden tortilla.
Ingredients
- 1 lb ground beef
- 1/2 cup onion, finely chopped
- 2 cloves garlic, minced
- 1 packet taco seasoning
- 1/2 cup water
- 1 cup shredded cheddar cheese
- 1 cup shredded Monterey Jack cheese
- 6 large flour tortillas
- 1/4 cup melted butter or vegetable oil
- Sour cream, salsa, chopped cilantro for serving
Instructions
Cook beef with onion and garlic, add taco seasoning and water, simmer. Fill tortillas with beef and cheeses, fold tightly. Brush with butter, bake until crispy. Serve with sour cream, salsa, and cilantro.
Notes
For extra crispiness, air fry or deep fry instead of baking. Mix up cheeses for different flavors. Customize fillings with beans or peppers.
- Prep Time: 15 minutes
- Cook Time: 25 minutes
- Category: Main Dish
- Method: Baking
- Cuisine: Mexican, Tex-Mex
Nutrition
- Serving Size: 1 chimichanga
- Calories: 520 kcal
- Sugar: 2g
- Sodium: 840mg
- Fat: 32g
- Saturated Fat: 14g
- Unsaturated Fat: 16g
- Trans Fat: 1g
- Carbohydrates: 32g
- Fiber: 2g
- Protein: 28g
- Cholesterol: 85mg
Keywords: beef chimichangas, cheesy chimichangas, homemade chimichangas, Tex-Mex beef recipe, crispy chimichangas